How to scan receipts in Node.js
Build a Node.js receipt OCR solution with this Github receipt scanner project!
Hannah O'Connor
Published in
Developer
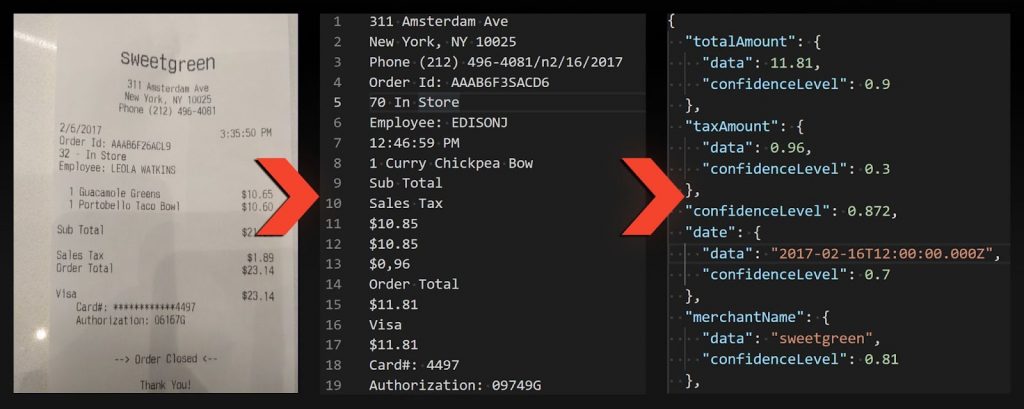
Store receipts include a standard of information – items, prices, store location. Taggun’s API helps you extract this structured data using an API call.
In this tutorial, we will:
- Build a Node.js server with a POST endpoint
- Read a scanned receipt file
- Integrate with Taggun API to return structured receipt data
The full code for this tutorial is available at https://github.com/taggun/taggun-node should you want to take a look at it for reference, or work with it to create something of your own!
💡 If you’re new to this, don’t worry. This article will explain all technical terms used in these little boxes here.
💡 An API (Application Programming Interface) is any connection that allows two apps to talk to each other, without having to know how each works behind the scenes.
Prerequisites
- The latest version of Node.js
- Your favorite text editor, like Visual Studio Code.
- A basic knowledge of writing JavaScript code
- Postman
- Well…images of some receipts, of course! Download an image of a sample receipt here.
First of all, we’ll install Node.js and the Node Package Manager (npm) on our operating system.
macOS and Windows
Installing Node + npm on Windows and macOS is simple, all you need is their installer.
- Download the installer at https://nodejs.org/en/
- Select the button to download the LTS build that is “Recommended for Most Users”.
- Install Node by double-clicking on the downloaded file and following the installation prompts.
Ubuntu
The easiest way to get Node and npm on Ubuntu is to get it from the Ubuntu binary distributions repository using these commands in your terminal:
Done. Now, let’s test if it all went smoothly.
Run the “version” command in your terminal/command prompt and check that a version string is returned:
Next, get the appropriate version of the Postman app for your system at https://www.postman.com/downloads/ and install it.
💡 Node.js lets you write JavaScript code outside of web browsers. It’s powerful, fast, easy to pick up, and great for pretty much any project you can think of!
💡 Postman is a great free program to test API’s with. We’ll be putting it to good use in our tutorial!
The Game Plan
Before writing any code, let’s talk about how we’re going to go about setting up and using Taggun. We’ll build a simple API of our own with an endpoint that accepts an image of a receipt (using the example receipt image we have on disk), sends that to Taggun for processing, then retrieves the results and sends them back to you.
In a real world scenario, your existing app would make calls to this proxy API with a picture of your receipt, and receive parsed and structured JSON data ready to be consumed by your app. That’s all there is to it.
💡 API Endpoints are just URL patterns that let two applications talk to each other. Think of them as the office watercooler spot. Places where conversations start!
💡 JSON (JavaScript Object Notation) is a way to write information in a structured way that’s easy for humans to read and understand, and for computers to parse and generate. Your favorite app probably uses data in a JSON format behind the scenes in some way!
Getting Started
First of all, create a directory for our project, give it a sensible name like taggun-project, and cd into it. Make sure you move your receipt (whether in JPEG or PNG format) into the same folder!
Then, we’ll use npm to install a few packages for us.
💡 You can use npm to install all kinds of third-party packages to make your job easier. Think of these as modules adding external functionality that'll help us set up and use Taggun quick and easy.
Type this into your terminal/command prompt.
These packages are Express.js to build our server/API with, form-data to structure our image upload in the format that the API needs ( a multipart/form-data stream), and finally axios to make the actual web request.
💡 the —-save flag just tells npm we’d like to store the names and versions of the things we’re installing, in a file called packages.json in your project folder. If anyone (including ourselves!) wishes to use our code in the future, all they’d have to do is type in ‘npm install’ and npm will do the rest, using the packages.json file.
With the basic setup out of the way, create a file called index.js in the root of your project directory, and let’s get down to coding!
index.js
💡 Remember, you need to replace the placeholder API Key variable in this example with your own!
All done! Save your work, and type in node index.js in your terminal to start the server. Once you see “Server listening on port 3000” in your terminal, you’re all set. Time to test our API with Postman.
Testing our API with Postman
Open up Postman, and click on “Create a Request” to add a new tab.
Remember, your server is running on port 3000, so we’ll have to make any requests to http://localhost:3000. Type that in, make sure you’re making a GET request, and hit Send.
So far so good. That’s the message we expect for a GET request to the default ‘/’ endpoint, so we know it’s working. Now let’s make the actual request, this time to the ‘/scan’ endpoint. So add a “/scan” to the end of the existing address, and hit Send again.
Suddenly, data!
This is a JSON document that includes properly structured data extracted from the receipt we sent, and you can easily read it to see which details Taggun has extracted from your receipt image like Vendor Name, Address, City, State, Payment Method, Payment Amount, Item Names and Amounts.
Congratulations! You’ve written a complete, functional API to expose an endpoint that takes in a receipt, sends it to Taggun for processing, and retrieves parsed results for you.
And don't forget, the Taggun OCR API handles invoices well too, useful for example in OCR accounts payable solutions, where the API automates and streamlines invoice processing.
This tutorial project has its own git repository at https://github.com/taggun/taggun-node – enjoy!
To further enhance your understanding of OCR for receipt recognition, it's beneficial to explore the five crucial phases of Taggun’s receipt OCR API engine, which includes OCR support, classification, named entity recognition, specialised entity extraction, and data enrichment.