How to scan store receipts with React
Automate receipt processing with React & receipt OCR (GitHub code included!)
Hannah O'Connor
Published in
Developer
Paper receipts mostly end up in the trash – they are hard to store for long periods of time, can’t be digitized easily, and formats differ across stores, locations, and regions.
What if we could turn a store receipt image, extract all the useful information out of it, and keep it in our records? Well, that's exactly what we’re going to do in this tutorial.
In this tutorial, we will:
- Build a React frontend project with Chakra UI components
- Let a user upload an image of a store receipt and pull out useful information such as item prices, store location, etc.
as JSON using Taggun API - Safely store the API key in an env file
Full source code: https://github.com/Hannahroseoc/taggun_react_turorial
Also, you can check out how to build a backend here – How to Scan Receipts in NodeJS
Pre-requisites
- Latest version of Node.js
- Your favorite text editor, like Visual Studio Code
- A basic knowledge of writing JavaScript code
- An image of a receipt. Here’s a sample one.
- API Key from Taggun
The Game Plan
Before we start building, here’s what are looking to achieve.
We will build a web app that lets a user select an image file to upload.
This can be an image of any store receipt. Once selected, it will be uploaded to the Taggun Receipt OCR API which converts the image to JSON data. All we have to do then is display it in a readable manner.
In a real-world scenario, you can use this same project to reward customers for the amount spent in-store, for receipt processing and data archiving purposes, or for simply converting non-structured data to structured data.
Getting started
Let’s start by creating a new React project.
Create React App takes care of generating a boilerplate project for us with a sensible file structure, a basic layout, and core packages – saving us a ton of time.
When the project is ready we can run it with:
Open up http://localhost:3000 to see it running in your browser.

Awesome! We have a basic React app going.
Add NPM packages
Let’s install some NPM packages to make our life easier.
Axios – Makes it easy to make a POST call to Taggun API
Chakra UI – Pre-built UI components
SaaS UI – Specialized UI components like Datatable and Loader for a loading animation
Once installed, let’s update the ./src/index.js file so we can use the brand new components from Chakra UI and SaaS UI:
Since it’s important the Provider is at the top-level file (index.js), all our React files will be able to correctly render the new components.
React UI – Upload image file
We are now ready to start building a UI that has:
1. Header section – explains what the project is and instructions on what the user should do next.
2. File upload section – a button to select a file from the computer and another to submit it.
I used a Ticket image as a logo in the Header section that you can download from here: https://github.com/Hannahroseoc/taggun_react_turorial/blob/main/public/outline.png
Make sure that you place it in the public folder for React to import it.
Update ./src/App.js like so:
Fantastic! Now we have a shell UI down that looks really good. The only problem is, it doesn’t do anything. Let’s fix that next.
Upload a file
We can use the onChange event on an input to listen to when a file has been selected by the user. The object is then is stored in a state variable.
Update the ./src/App.js :
Add a Submit button
Similar to the input, a Button also has an event onClick that gets triggered when someone clicks it. We can use this to upload the file using Axios to Taggun.
Taggun expects a POST request with a file attached and an apikey as the header.
Update the ./src/App.js :
Note: Remember to replace the API_KEY with yours from Taggun.
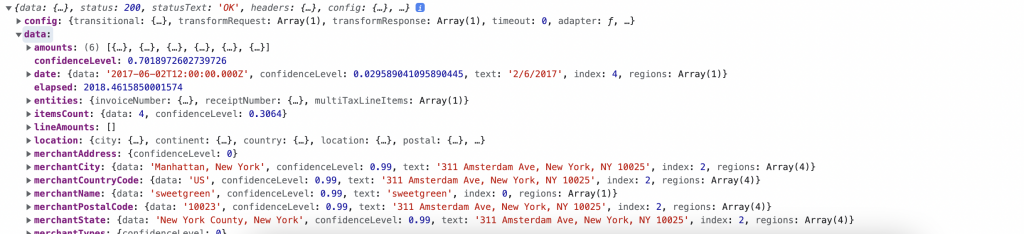
Run the project with npm start and try to upload the receipt image and press Submit. If everything goes well, you should see a JSON response in your console from Taggun.
Here’s what mine looks like:
React UI – Polish up
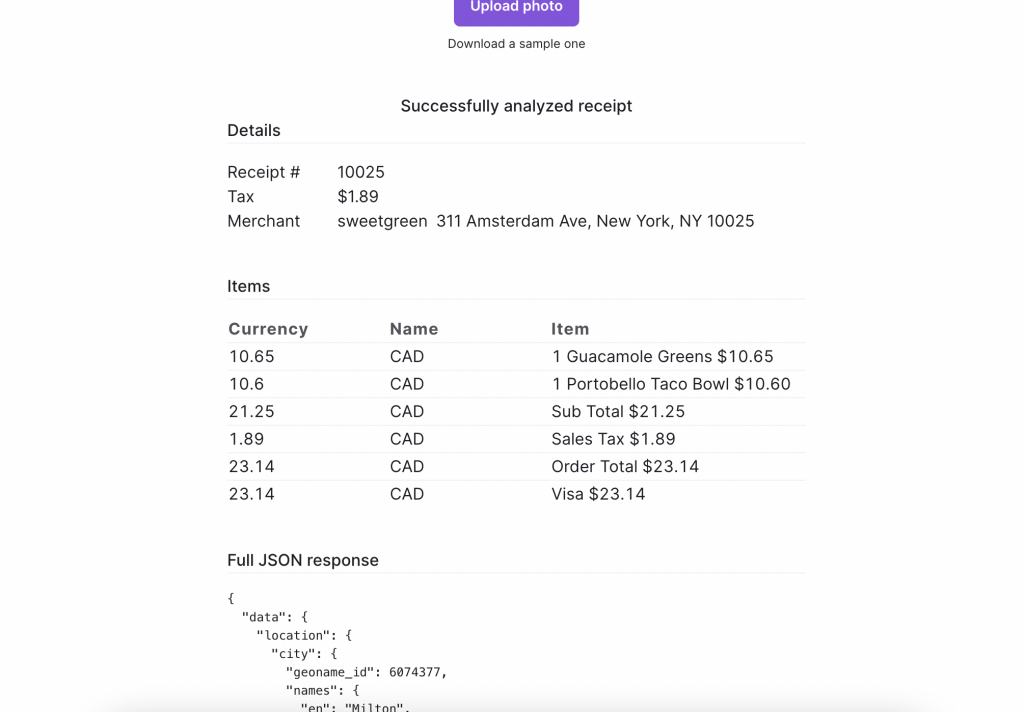
Now that we have data being returned from the API, we can polish up our UI so the user can easily interpret the data. Here’s how I chose to do it:
1. Show merchant’s address as Text
2. Show items sold in a Data Table
3. Show full response as JSON
I also added a loading animation for when we are waiting for the results to be processed.
Here’s what the UI looks like with the polish changes applied. Not too shabby right?
Environment Variables
It is a bad practice to save your API Key with the rest of your source code in case it gets leaked when you commit your code to Github. Let’s use env variables to hide it away.
Create a new file called .env and add your own API Key:
Now we can update the submitPhoto in ./src/App.js with:
Congratulations! You’ve now built a fully functioning React project that can scan receipts and pull out important information such as items bought, price, tax amount, store name, etc.
Download the source code here – https://github.com/Hannahroseoc/taggun_react_turorial